Many people across the world enjoy taking Landscape photos. In fact, a large number take this type of photo without really understanding some of the essential requirements. So here are some useful tips:
- – The ‘mode’ dial setting for exposure can be set in Aperture priority (Av for Canon & A for most other makes)
- This allows you to select a suitable aperture: the bigger the ‘f’ number the greater the ‘depth-of-field’ thereby giving an increased range of focus within your image
- I recommend using a low ISO number (100-200) and utilise a tripod if available. This improves the quality of your image. Do not use ‘auto ISO’ as this will normally select a much higher ISO depending on available light & could result in a grainy image.
- Should there be very low light (cloudy sky or dusk) then you have little choice but to increase the ISO if you don’t have a tripod – as the shutter speed is likely to be too slow & a blurry image will likely result
- In aperture priority the shutter speed will be selected by the camera in order to obtain the correct exposure and being on a tripod will mean the image should be sharp
- Although, if no tripod is available and the camera is hand-held the only real choice will be to increase the ISO to provide a sufficiently fast shutter speed
- I suggest focussing around a third of the way into the scene as this is likely to further increase the range of focus
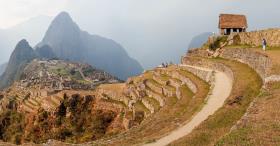
- Finally, consider the composition within the scene; the ‘rule-of-thirds’ is commonly utilised here and simply means considering where you place key subjects within the scene and also where you place the horizon – not usually in the middle. Take some time to think this through and carefully consider the best composition for the scene to be photographed. See example photo below.
Good luck.
I do offer feedback on photos so please try the ‘Photo Evaluation’ section to have your image(s) judged and receive constructive feedback 🙂