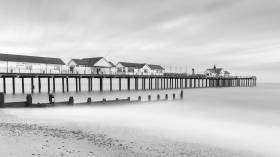
Capturing moving water in different ways can be a real joy as the water droplets display another creative image opportunity when photographed with a slower shutter speed.
In this section you will discover how to effectively capture the blurry (milky) water effect much loved by many as ‘something different’.
- Ideally, you will need to use a tripod to support your camera
- The reason for this will be that a slow shutter speed will be used and if hand-holding the camera its likely the whole image will be blurred rather than just the water!
- Therefore, I suggest initially setting the ‘Mode’ dial for exposure to ‘Shutter Priority’ (Tv with Canon and S for most other makes)
- It may be necessary to utilise the ‘Manual’ exposure setting for some photos (more on this below)
- Having already selected the location for your camera and the most suitable composition of the scene, allowing for the water to be leading through the image, set the ISO to a low number (100) as this will greatly assist in reducing the light sensitivity of your cameras sensor and thereby allow for a slower shutter speed. The low ISO also provides you with a higher quality image
- Subject to just how close you are to the water and also how fast the water flow is, you can then select a suitable shutter speed – perhaps around 1/20 second
- This speed may need to be slowed even more if the water is slower moving or you’re seeking an exceptionally blurry water effect – to achieve this on a bright sunny day will require the attachment of filters on your lens (more on filters below)
- One benefit from setting a slow shutter speed in Shutter Priority will be in obtaining a higher aperture number (perhaps f16 – 22+) to provide a correct exposure. However;
- Check the exposure settings given by the camera as you will ideally want the image sufficiently bright but not with burnt out highlights (bright areas) or areas that are too dark, and make fine adjustments as required
- If there is a problem with this it may be preferable to select the ‘Manual’ exposure setting, where you are in control of both the shutter speed AND the aperture settings
- In this case, select a higher aperture number such as f18 (and higher, subject to lens attached) and a slower shutter speed – keep an eye on the exposure reading displayed in the viewfinder or rear screen, and make fine adjustments as required
- If the image captured is still too bright then a suitable filter needs to be applied to the front of your lens. A Neutral Density (ND) filter is most commonly used here and these are available in different densities (equivalent to 2 stops darker through to 15 stops darker)
- A significant benefit from utilising such filters when in “Manual’ mode will be to assist in slowing the shutter speed even further, perhaps down to several minutes, even when photographing in bright sunshine! Thereby providing exceptionally slow moving water and the milky water effect loved and admired by so many
- In order to calculate the required exposure setting may necessitate the use of the filter instructions, or another App or simply working the calculation out yourself.
- Finally, try moving (carefully) to a different location if possible, just to provide a variety of scenes and different aspects, perhaps try portrait/vertical and landscape/horizontal. Good luck.
- Either way, with practice, it can provide you with some amazing images!
I do offer feedback on photos so please try the ‘Photo Evaluation’ section to have your image(s) judged and receive constructive feedback 🙂